
That ‘hurts so good’ feeling isn’t from crushing muscle knots; it’s a sensory dialogue with your fascia, rehydrating it and calming your nervous system.
- Fascia is a fluid, sensory web. The goal is to gently ‘melt’ adhesions with sustained pressure, not force.
- Proper hydration is non-negotiable for fascial health, as water is the medium for this tissue release.
Recommendation: Shift from aggressive rolling to slow, mindful pressure. Hold on a tender spot, breathe, and wait for the tissue to release, treating it as a conversation, not a battle.
If you’re an athlete, a weekend warrior, or anyone dealing with chronic tightness, you know the feeling. You place a foam roller under a tight spot, and a sharp, intense, almost electric sensation shoots through the area. It hurts, but as you breathe through it, the intensity subsides, replaced by a wave of release and warmth. It’s that paradoxical “good pain.” For years, the common explanation has been that you are “breaking up knots” or “smashing adhesions” in your muscles. This aggressive language suggests a battle, a fight to tenderize tough tissue.
But what if this understanding is fundamentally flawed? As a bodywork therapist specializing in fascia, I can tell you the magic of foam rolling has less to do with brute force and more to do with a sophisticated conversation you’re having with your body’s most underrated system: the fascia. This web of connective tissue is not just plastic wrap around your muscles; it’s a living, intelligent, sensory organ. The pain you feel is a powerful signal, and the relief that follows is your nervous system responding to the right kind of input. It’s not about destroying knots, but about rehydrating a thirsty sponge and calming a hyper-alert nervous system.
This guide will reframe your entire approach to self-myofascial release. We will explore why hydration is the secret key to unlocking tight tissue, how to apply pressure without causing damage, and when to use specific tools for different problems. We’ll also debunk dangerous myths, like the “no pain, no gain” approach to an inflamed IT band, and provide clear protocols for both pre-workout mobility and post-workout recovery, all contextualized for the unique demands of life in Canada.
Summary: Understanding Fascia and the Art of Release
- Why Is Drinking Water Essential for Unlocking Tight Fascia?
- How to Hold a Trigger Point Without Bruising Yourself?
- Roller or Ball: Which Tool Targets Glute Pain Better?
- The “No Pain No Gain” Mistake of Rolling an Inflamed IT Band
- When to Roll: Before Workout for Mobility or After for Recovery?
- How to Use Hot and Cold Water to Flus Inflammation from Your Wrists?
- Why Can a Misaligned Vertebra Cause Stomach Issues?
- How to Fix “Tech Neck” Pain Without Spending Hours at the Physio?
Why Is Drinking Water Essential for Unlocking Tight Fascia?
Think of your fascia as a dense, three-dimensional spider web made of collagen fibres, but this web is suspended in a gel-like substance called the interstitial fluid. Healthy fascia is slippery and well-hydrated, allowing muscles to glide past each other effortlessly. When you’re dehydrated, this gel becomes thick and sticky, like honey instead of water. This is what creates adhesions and restrictions. You can roll all day, but if the tissue doesn’t have the fluid to become pliable again, you’re just pressing on a dry sponge.
This process is known as thixotropy: the property of a substance to become more fluid when pressure or agitation is applied. By applying slow, sustained pressure with a foam roller, you are essentially warming up that sticky gel, encouraging it to transition back into a more liquid state. But this can only happen if there is enough water available in the system. Without adequate hydration, the tissue remains dense and brittle. This is why you can feel stiff and achy even after a rolling session if you haven’t been drinking enough.
In Canada, access to drinking water is generally good, yet staying hydrated, especially during dry winters, is crucial. A study on drinking water consumption in Canadian subarctic communities highlights the reliance on local water sources, underscoring the fundamental need for consistent intake. To truly benefit from foam rolling, you need to make hydration a priority. Sip water throughout the day rather than chugging it all at once; your fascia needs a steady supply, not a flood. Furthermore, including foods rich in vitamin C supports collagen synthesis, and electrolytes like magnesium and potassium help maintain the fluid balance within the fascial tissues.
How to Hold a Trigger Point Without Bruising Yourself?
The term “trigger point” can be misleading. It’s not a button to be mashed. It’s a localized area of hyper-irritable tissue, often a patch of fascia that has become dehydrated and is sending distress signals to your brain. The goal of rolling isn’t to obliterate this point with force, which can lead to bruising and further inflammation, but to have a gentle, persuasive conversation with the nervous system that controls it.
This is where the technique of sustained compression comes in. Instead of rolling quickly back and forth over the tender spot, find the point of primary discomfort, and simply rest your weight on it. Breathe deeply and slowly. Imagine your body “melting” or “sinking” into the roller. Initially, the pain might be sharp (a 7/10 on the pain scale), but as you hold the position for 30-90 seconds, you should feel the intensity gradually decrease. This is your nervous system accepting the input, deciding the pressure is safe, and telling the tissue to let go. If the pain stays high or sharpens, you’re being too aggressive. This approach respects the tissue’s sensory function.
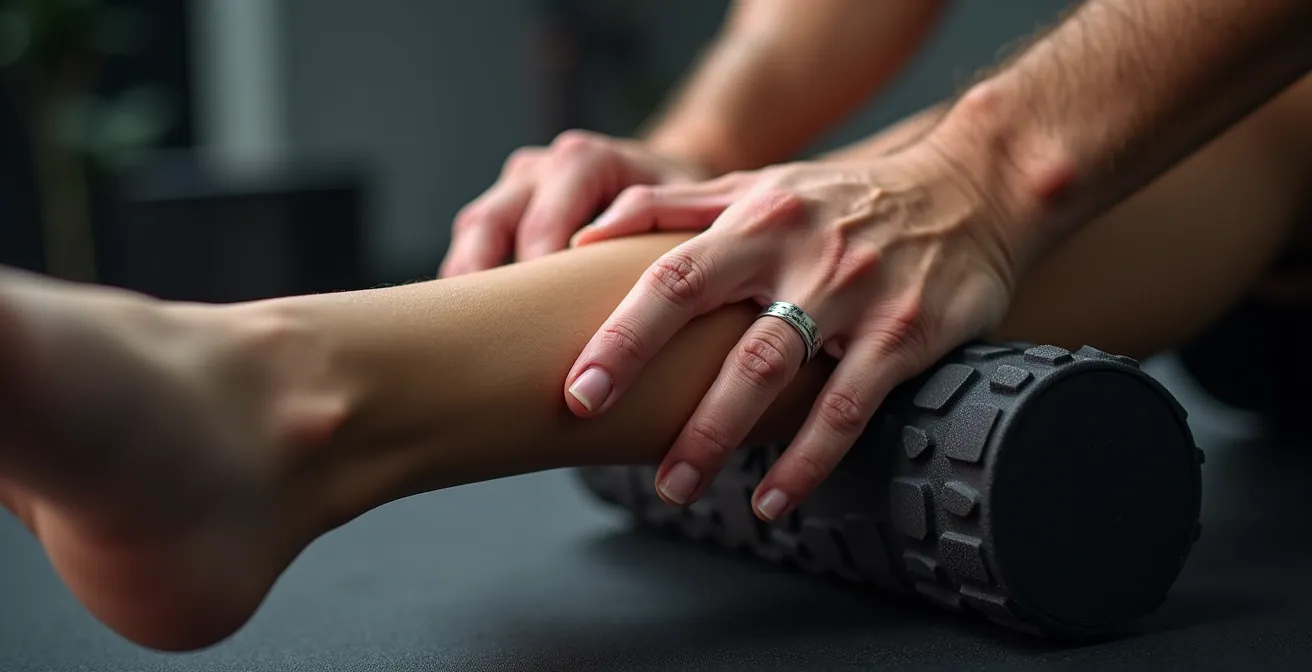
This controlled method prevents bruising because you aren’t shearing or tearing the delicate capillaries in the area. You are simply applying enough pressure to initiate a thixotropic change and a neurological release. According to guidance for military personnel, the key is finding the delicate balance between beneficial pressure and overwhelming pain. The mantra should not be “no pain, no gain,” but rather “listen to the release.” Bruising is a sign of tissue damage, not progress.
Roller or Ball: Which Tool Targets Glute Pain Better?
When dealing with glute pain—a common complaint from athletes with “hockey butt” to desk workers with “commuter glutes” from long sits on the GO Train—the choice of tool is critical. It’s not about which tool is universally “better,” but which one is right for the specific layer of tissue you need to address. A foam roller and a lacrosse ball offer vastly different types of pressure and are suited for different jobs.
The foam roller provides broad, distributed pressure. It’s excellent for a general flush of the large gluteus maximus muscle. Think of it as a rolling pin smoothing out a large sheet of dough. It’s ideal for warming up the area, increasing overall blood flow, and addressing superficial stiffness. For post-workout recovery or a general mobility routine, the roller is your go-to tool to cover a large surface area efficiently.
The lacrosse ball, on the other hand, offers intense, focused pressure. It acts more like a thumb, allowing you to sink deep into the tissue and target specific, stubborn trigger points that the roller might glide over. It’s the perfect tool for getting into the deeper muscles like the gluteus medius and piriformis, which often harbour the true source of sciatic-like pain. When you find a tender spot deep in the hip, the ball allows for precise, sustained compression. As a leading health resource notes, the approach depends on the target.
This table from a comparative analysis on Healthline breaks down the choice, adapted for a Canadian context.
| Tool | Best For | Pressure Level | Target Area | Canadian Context |
|---|---|---|---|---|
| Foam Roller | General muscle flush | Moderate, distributed | Large gluteus maximus | Ideal for ‘Hockey Butt’ warm-up |
| Lacrosse Ball | Trigger points | Intense, focused | Deep gluteus medius/piriformis | Better for ‘Commuter Glutes’ from GO Train sitting |
Ultimately, a comprehensive approach often uses both. Start with the roller for a general flush, then switch to the ball to hunt for and release specific points of deep tension. This layered approach ensures you are communicating with both the superficial and deep fascial layers. As Dr. Charlotin highlights in his work on referred pain, the source of discomfort is often not where the pain is felt. He states in a guide on Hinge Health that many people just perform self-massages in the immediate area where they feel pain, but you must also focus on connected tissues like the TFL muscle at the hip to achieve lasting relief.
The “No Pain No Gain” Mistake of Rolling an Inflamed IT Band
One of the most common and damaging myths in the world of foam rolling is the idea that you should aggressively roll an inflamed iliotibial (IT) band. Runners and cyclists often grind a roller up and down the side of their thigh, wincing in pain, believing they are “breaking it up.” This approach is not only ineffective but is likely making the problem worse. The key piece of information missing from this common practice is this: the IT band is not a muscle.
It is an incredibly thick, dense band of fascia. You cannot stretch it or lengthen it through rolling any more than you could stretch a leather belt by pressing on it. When you feel pain along the side of your knee (a hallmark of IT band syndrome), the IT band itself is often irritated and inflamed from friction. Aggressively rolling directly on this inflamed tissue is like repeatedly pressing on a bruise or picking at a scab—it only increases irritation and prolongs the inflammatory response.
The pain and tightness associated with IT band syndrome almost always originate from the muscles that attach to it at the hip: the tensor fasciae latae (TFL) and the gluteus maximus. These are the muscles you should be targeting with your roller or ball. By releasing tension in the TFL (at the front of your hip) and the glutes (at the back), you reduce the pulling force on the IT band, which in turn allows the inflammation at the knee to calm down. According to research focused on Canadian cyclists, where up to 48% of recreational cyclists reported knee pain, direct rolling of the ITB itself is misguided because it fails to address the source of the tension at the hip.
When to Roll: Before Workout for Mobility or After for Recovery?
The question of whether to foam roll before or after a workout is not an either/or proposition. The answer is both, but the technique and intention are completely different. The timing of your rolling session should align with the goal you want to achieve for your nervous system: activation or restoration. This is particularly relevant for Canadian athletes moving between activities like curling, skiing, and hockey.
Before a workout, the goal is to increase mobility and prime the nervous system for movement. This calls for dynamic, activation-focused rolling. You should use shorter durations (5-10 seconds per muscle group) with more rhythmic, flowing movements. The aim is not deep release but to increase blood flow, warm up the tissue, and tell your brain, “We’re getting ready to move!” For a hockey player, this might mean quick rolls over the hip flexors and glutes to prepare for explosive skating. This pre-activity rolling improves your range of motion without decreasing power output.

After a workout, the goal shifts entirely to recovery and down-regulating the nervous system. This is the time for slow, deliberate rolling with static holds on tender spots (30-90 seconds). The objective is to stimulate the parasympathetic nervous system (our “rest and digest” mode), flush out metabolic byproducts, and begin the tissue repair process. After a long day of skiing or a tough session of snow shoveling, slow rolls on the quads, glutes, and calves can significantly reduce next-day soreness (DOMS). This type of rolling tells your body, “The work is done; it’s time to repair and relax.”
Your Action Plan: Sport-Specific Foam Rolling Schedule
- Pre-Curling: Dynamic rolling for hips and thoracic spine (5-10 seconds per area) to increase range of motion for your delivery.
- Post-Skiing: Static holds for quads, glutes, and calves (30-90 seconds) to stimulate parasympathetic recovery after a day on the slopes.
- Day After Snow Shoveling: Gentle full-body flush with light pressure to ease general stiffness from this uniquely Canadian workout.
- Pre-Hockey: Fast activation rolling on hip flexors and glutes to prime the nervous system for powerful strides.
- Post-Running on Canadian trails: Slow, deliberate recovery rolling focusing on IT band attachments (TFL and vastus lateralis), not the band itself.
How to Use Hot and Cold Water to Flus Inflammation from Your Wrists?
For those in Canada’s booming tech sector or anyone who spends hours typing, wrist and forearm pain is a common ailment. While foam rolling the forearm muscles is a great first step, you can significantly enhance recovery by using a simple, powerful tool: contrast hydrotherapy. This technique involves alternating between hot and cold water to create a “pump” effect within the circulatory and lymphatic systems, helping to flush out inflammation and metabolic waste.
The mechanism is straightforward. Immersing your wrists and forearms in hot water (comfortably hot, not scalding) causes vasodilation, where the blood vessels expand. This brings fresh, oxygenated blood and nutrients to the area. After 3-4 minutes, you switch to cold water for 30-60 seconds. The cold causes vasoconstriction, squeezing the blood vessels. This alternating expansion and contraction acts like a natural pump, pushing out stagnant fluid, inflammatory byproducts, and waste that has accumulated in the interstitial space of your fascia.
This method is particularly effective for repetitive strain injuries where chronic, low-grade inflammation is present. For the best results, perform this after you have used a lacrosse ball or small roller on your forearm flexors and extensors. The rolling releases the mechanical tension, and the contrast water therapy provides the hydraulic flush to clear the area. The protocol is simple: repeat the hot/cold cycle 3-5 times, always ending on a cold cycle to help close off the vessels and minimize any residual swelling. It’s a powerful way to accelerate recovery right from your own sink.
Why Can a Misaligned Vertebra Cause Stomach Issues?
The connection between your spine and your digestive system might seem obscure, but it becomes crystal clear when you understand the continuous nature of fascia. Your body isn’t a collection of separate parts; it’s a unified whole, intricately connected by a web of fascia. A key player in this connection is the thoracolumbar fascia, a large, diamond-shaped sheet of connective tissue in the lower back that anchors many crucial muscles, including the diaphragm.
When a vertebra in your mid-to-lower back (the thoracic or lumbar spine) is misaligned or when the surrounding muscles are in chronic tension, it creates a drag or pull on this fascial sheet. Because the diaphragm—your primary breathing muscle—is interwoven with this fascia, its movement can become restricted. Instead of a full, deep diaphragmatic breath that massages the abdominal organs, you may adopt a shallow, chest-breathing pattern. This creates passive tension on the abdominal cavity itself.
This constant, low-grade tension can affect organ mobility and function. Think of your organs as being suspended in a fascial sling. If that sling is pulled tight from one side due to spinal issues, it can impede the natural motility of the stomach and intestines. As fascia research points out, this fascial tension is a critical and often overlooked factor in visceral health.
Chronic tension or restriction in the thoracolumbar fascia can impede full diaphragmatic breathing and create passive tension on the abdominal cavity, potentially affecting organ mobility and function.
– Research synthesis, Fascia and Digestive System Connection Study
This explains why a chiropractor, osteopath, or massage therapist might work on your back to help alleviate digestive complaints. By restoring proper spinal alignment and releasing tension in the thoracolumbar fascia, they are indirectly freeing up the abdominal cavity, allowing your organs to function without mechanical restriction. It’s a powerful example of how a problem in one area of the body can manifest symptoms somewhere else entirely, all connected by the fascial web.
Key Takeaways
- The ‘good pain’ of rolling is a neural and hydraulic event in your fascia, not the forceful breaking of muscle knots.
- Hydration is paramount; you cannot release ‘sticky’ tissue without sufficient water in your system.
- Technique matters: use slow, sustained pressure to communicate with your nervous system, not aggressive force that causes damage.
How to Fix “Tech Neck” Pain Without Spending Hours at the Physio?
“Tech neck,” that persistent ache and stiffness in the neck and shoulders from hunching over screens, has become an epidemic for Canada’s remote workforce. While a foam roller can provide temporary relief, it often doesn’t create lasting change. Research on foam rolling often notes its effects are primarily on short-term flexibility. To truly fix tech neck, you must address the root cause: the chronic postural pattern of a forward head and rounded shoulders. This requires a three-pronged approach: release, mobilize, and strengthen.
First, you must release the muscles that are chronically tight and pulling you forward. The primary culprits are usually the pectoral (chest) muscles and the upper trapezius (top of the shoulders). Using a lacrosse ball against a wall is far more effective than a foam roller for this, allowing you to apply precise pressure to these areas. Second, you must gently mobilize the neck to restore its natural range of motion. This doesn’t mean aggressive stretching, but slow, controlled movements like chin tucks and gentle rotations.
The final, and most crucial, step is to strengthen the weak muscles that are supposed to hold your head in proper alignment. The deep neck flexors are small endurance muscles at the front of your neck that get “lazy” in a forward-head posture. Simple isometric chin tucks, where you gently press your head back into your hands or a headrest, can wake these muscles up. By consistently performing this release-mobilize-strengthen cycle throughout your workday, you are actively retraining your posture, not just chasing the pain. This creates lasting change where rolling alone would only offer a temporary fix.
Your Action Plan: The 5-Minute WFH Reset Protocol
- RELEASE (2 min): Use a lacrosse ball against a wall to slowly roll your pectoral muscles and upper traps. Move at a rate of about one inch per second, pausing on tender spots.
- MOBILIZE (2 min): Perform 10 gentle neck rotations in each direction, followed by 10 slow chin tucks, bringing your chin back as if creating a double chin. Avoid any sharp or painful movements.
- STRENGTHEN (1 min): Perform 3-5 isometric chin tucks. Gently tuck your chin and press your head backward into your clasped hands, holding for 5-10 seconds. You should feel the muscles at the front of your neck engage.
- Frequency: Perform this quick reset every 2 hours during your work-from-home days to break the cycle of postural strain.
- Red Flag: Stop immediately if you experience any sharp pain, numbness, or tingling. If symptoms persist for more than 48 hours, consult a healthcare professional.
–
By understanding that foam rolling is a dialogue with your fascial system, you can transform your practice from a painful chore into a powerful tool for recovery, mobility, and overall well-being. Apply these principles consistently, listen to your body, and you will unlock a new level of movement freedom.
Frequently Asked Questions on Fascial Release and Recovery
How long should I alternate between hot and cold water for wrist pain?
The standard protocol is to apply hot water (comfortable, not scalding) for 3-4 minutes, followed immediately by cold water for 30-60 seconds. Repeat this entire cycle 3 to 5 times, finishing with a cold application.
Should I foam roll my forearms before or after the water therapy?
For optimal results, roll your forearm flexors and extensors with a ball or small roller first. This releases the mechanical tension upstream. Then, use the contrast hydrotherapy to provide a hydraulic flush for enhanced drainage and inflammation removal.
Is contrast hydrotherapy safe for repetitive strain from activities like hockey stick handling?
Yes, it is generally safe and effective. However, if you are dealing with acute, sharp inflammation, it is wise to start with less extreme temperatures and shorter durations to see how your body responds before progressing to the full protocol.